A lot of what makes the E9 pedal steel sound the way it does comes from how the pedals are used. They shape chords, connect phrases, and create movement that isn’t possible any other way.
But all of that starts with your left foot.
If your foot isn’t able to move comfortably and accurately between pedals, a lot of musical ideas break down before they even have a chance to come together.
The good news is that the number of actual pedal movements you need isn’t unlimited. When you break it down, most playing comes from a handful of combinations between the A, B, and C pedals.
Once those movements feel natural, your playing starts to feel much more connected, and you don’t have to think through every motion.
Why These Warm-Ups Matter
Using the pedals is similar to something like driving a car—at first it takes attention, but over time it becomes automatic.
The goal of these exercises is to:
- Build muscle memory in your left foot
- Smooth out transitions between pedal combinations
- Develop consistency in timing and control
This is all part of developing your technique on the instrument, and it directly affects how fluid your playing feels when you’re actually making music.
Rather than thinking of these as isolated drills, think of them as covering the core movements your foot needs to know.
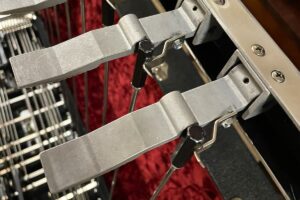
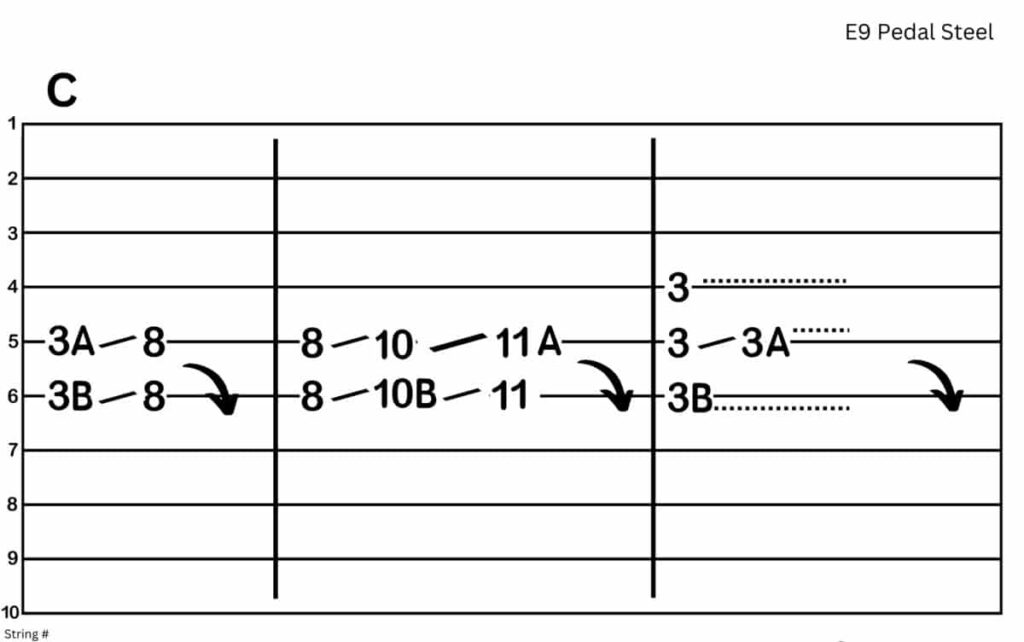
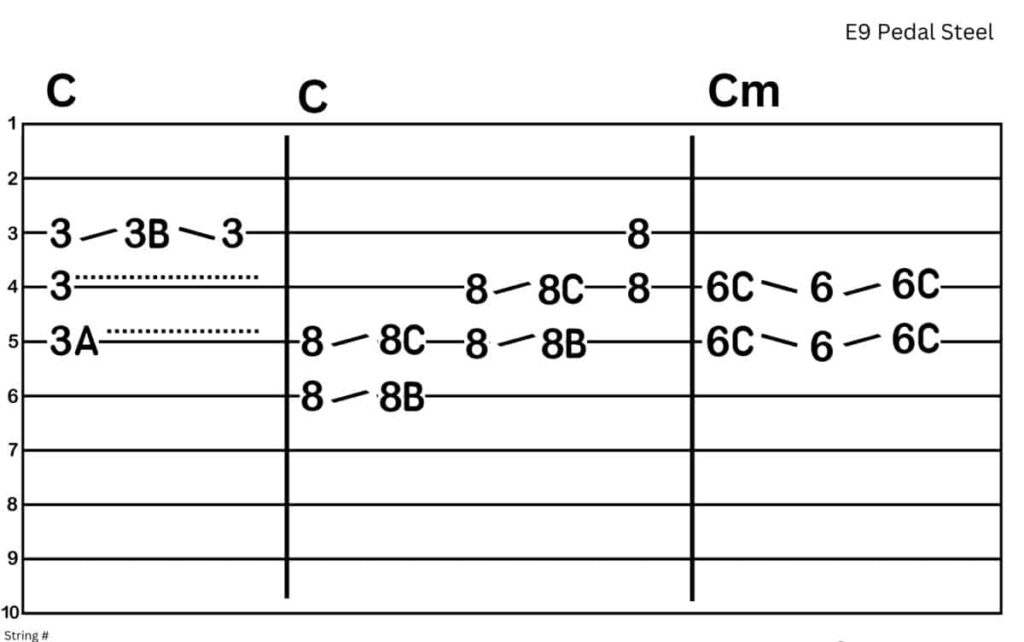
The Core Pedal Movements (A, B, and C)
Before getting into the exercises, it helps to think about what your foot is actually doing.
Most of your movement on the E9 neck comes from:
- A pedal (B → C#)
- B pedal (G# → A)
- C pedal (E → F# and B → C#)
And combinations like:
- A + B
- B + C
- Moving between A and B
- Rocking between pedals
These exercises are designed to isolate and connect those movements so they become second nature.
Exercises 1–3: Establishing Basic Pedal Movement
These first patterns are about getting comfortable with:
- Engaging single pedals
- Moving between pedals
- Keeping timing consistent
Focus on:
- Even timing between notes
- Clean transitions when pedals engage
Don’t rush these. This is where the foundation gets built.
Exercises 4–6: Combining and Connecting Pedals
Now you’re starting to connect movements together.
These exercises work on:
- Moving between combinations (like A only to A+B)
- Coordinating foot movement
- Keeping the sound continuous while changing pedals
Try to avoid any “gaps” in sound. The pitch should feel like it’s flowing as your foot moves, not stepping from one note to another.
This kind of smooth movement becomes much easier once your foot develops consistency over time, especially when you’re not overthinking each motion.
Exercises 7–8: Applying Pedal Movement to Simple Licks

At this point, the focus shifts slightly.
Instead of isolated movement patterns, these exercises apply the same pedal combinations to simple, musical licks.
You’ll notice:
- Familiar A, B, and C pedal movements
- Short melodic phrases instead of straight patterns
- More emphasis on timing and phrasing
These are still simple, but they start to feel more like something you’d actually play in a song.
The goal here is to:
- Keep your pedal movement smooth
- Stay relaxed while playing a phrase
- Let the foot movement support the sound instead of interrupting it
This is an important step, because it bridges the gap between “exercise” and “playing.”
Exercises 9–10: Connecting Pedal Movement to Musical Phrasing
These final exercises continue in that same direction, connecting timing and phrasing to the harmony.
They bring together:
- Multiple pedal movements within a phrase
- Consistent timing across the line
- Control without overthinking each motion
Rather than focusing on the mechanics, try to hear these as complete musical ideas.
If your foot is doing its job well, you shouldn’t have to think about it—you’ll just hear the phrase and let the movement follow.
This is where the earlier work starts to pay off. The same basic pedal movements are still there, but now they’re part of something musical.
How to Practice These Effectively
To get the most out of these:
- Start slow
- Focus on smoothness over speed
- Use a metronome or steady pulse
You don’t need to spend a long time on each one.
Even 5–10 minutes at the beginning of a session can make a noticeable difference, especially when done consistently.
Over time, these movements start to connect directly to how you play through positions on the neck, since most phrases rely on these same pedal relationships.
Bringing This Into Your Playing
Once these movements feel comfortable, you’ll start to notice:
- Less hesitation when moving between pedals
- Smoother phrasing
- More control over how notes connect
This is where technique starts feeding into musical application.
Instead of thinking about what your foot is doing, you’re able to focus on what you want to hear.
Conclusion
There aren’t as many pedal movements as it might seem at first.
When you break them down and spend a little time working through them consistently, your foot begins to handle them automatically.
From there, your playing starts to feel more natural, more connected, and a lot less forced.
Taking This Further
As these movements become more comfortable, the next step is hearing how they show up in actual phrases and musical ideas.
That becomes much clearer when you work through real examples in 200 Country Riffs & Licks for E9 Pedal Steel, where these same pedal combinations are used in context.
Understanding how these pedal movements relate to chords and positions across the neck also becomes easier when you spend time with The Chord Guide for E9 Pedal Steel.
If you want help refining how your foot technique connects to your overall playing, working through these movements in one-on-one pedal steel lessons can help tie everything together quickly.