
When playing E9 pedal steel, you’ll start to notice that many licks, melodies, and ideas tend to show up in the same areas on the fretboard.
That’s not a coincidence.
Most of what you’re hearing and learning is happening within the three main positions on the E9 neck.
Learning how to play fluently at these positions is one of the fastest and most effective ways to understand the instrument. Once you begin connecting them, you’re covering most of the fretboard in a clear and organized way.
So what exactly are these positions—and how do you actually use them?
What the Main Positions Really Are
The main positions are used so often because they give you access to a large amount of musical material in one place.
At each position, you can find:
- chords
- scales
- licks
- melodies
with little to no bar movement.
Instead of moving across the fretboard constantly, you’re using pedals and levers to access different sounds within the same area. That’s a big part of what gives pedal steel its characteristic sound.
Another way to think about it:
When everything you need is organized in one place, it becomes much easier to play fluidly and make musical decisions in real time.
This also aligns closely with the Nashville Number System, where you start recognizing patterns instead of memorizing isolated shapes.
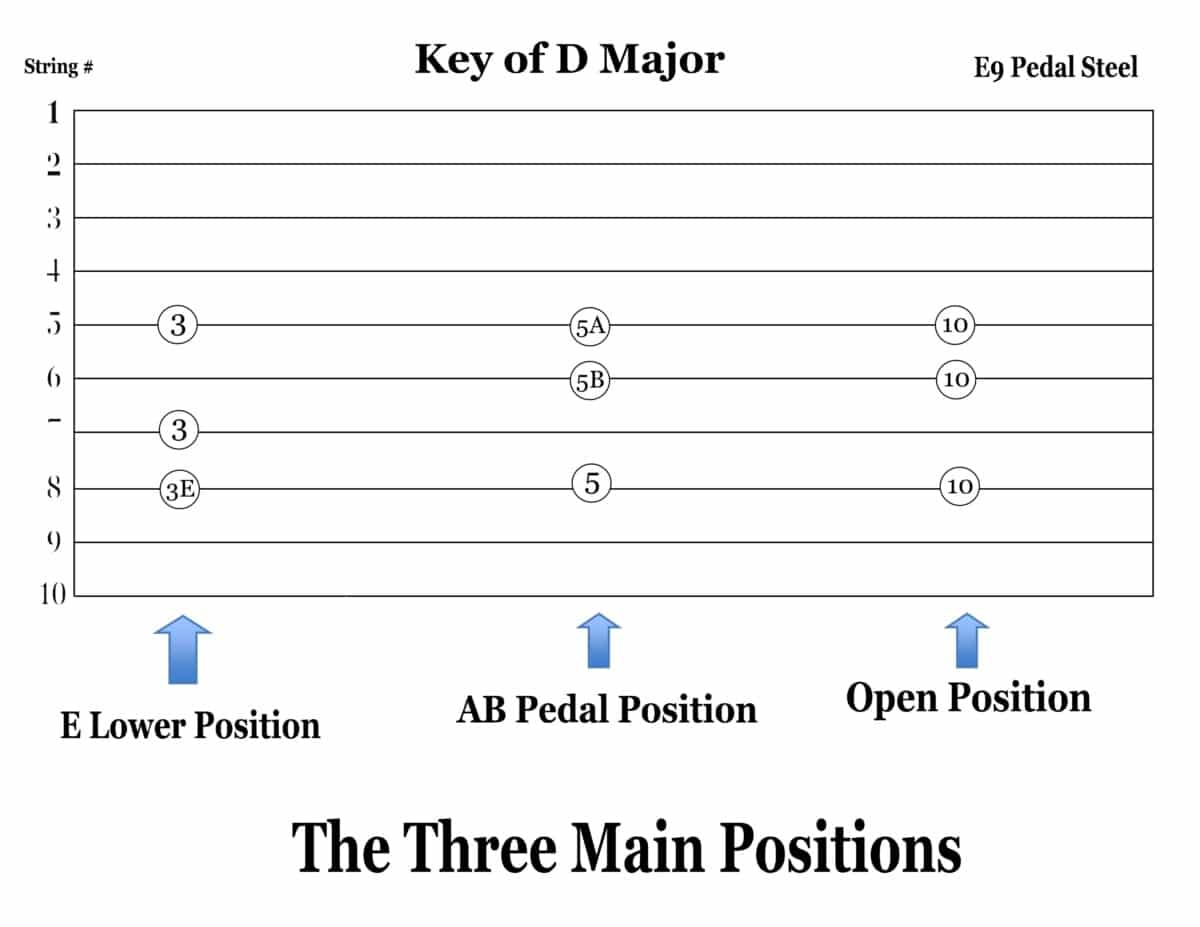
The Three Main Positions
Each position is defined by the pedals or levers you’re using to form the chords in a key.
Open Position
- No pedals or levers engaged
- Forms many of the major chords in the key
AB Position
- A & B pedals engaged
- Forms many of the major chords in the key
E Lower Position
- E-lowering lever engaged
- Also forms major chords in the key
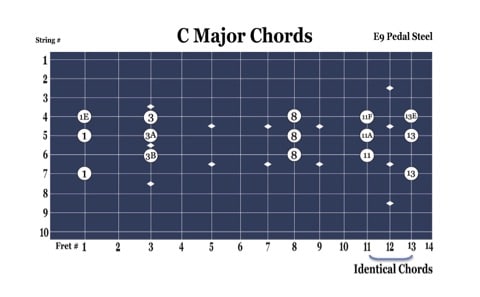
Here’s what these look like on the fretboard in the key of D:
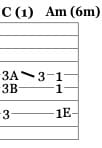
Finding Chords at Each Position
One of the biggest advantages of these positions is how many chords you can access without moving the bar.
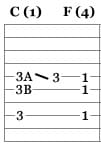
For example, in the key of C at the open position (8th fret):
- C major → no pedals
- A minor → A pedal
- F major → A & B pedals
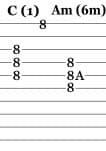
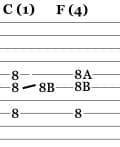
Once you start seeing this, chords become much easier to memorize and navigate—especially when using the Nashville Number System.
You can also find the same relationships at the other positions:
Using Scales at the Main Positions
Scales also become much more manageable when you organize them around the main positions.
The major scale, for example, can be played efficiently at each position with very little bar movement.
The same goes for:
- major pentatonic
- minor pentatonic
Once you understand how these scales sit within each position, they become much easier to apply musically.
If you want to see how this connects directly to your fretboard layout, it helps to understand how these patterns map across the neck.
Connecting the Positions
The real power comes from connecting these positions together.
Here are the relationships:
- Open position = 5 frets above AB position
- E Lower = 5 frets above Open
- E Lower = 2 frets behind AB
These relationships give you a framework for moving across the fretboard without guessing.
Once you start connecting them, you’re no longer thinking in isolated spots—you’re moving through the instrument.
Practicing ideas across these areas is one of the most effective ways to build consistency and awareness over time.
What About the AF Combination?
You might be wondering why the AF combination isn’t included as a main position.
It is useful—especially for chord movement—but it doesn’t offer the same level of intuitive access to scales and chord groupings as the other three positions.
In many ways, the E lower position overlaps with and extends some of the functionality of the AF combination, while offering more flexibility.
Bringing It All Together
If you focus your practice around these three positions, you’ll build a much clearer understanding of the fretboard.
A simple way to structure practice:
- Work through each position separately
- Practice:
- chords
- scales
- licks
- melodies
Then begin connecting them.
This approach helps you avoid practicing aimlessly and gives you a clear path forward.
Taking This Further
Most players struggle with the E9 neck not because the ideas are too difficult, but because they don’t have a clear way to organize them.
These three positions provide that structure—but learning how to connect them musically is where things really start to open up.
If you want a more structured way to work through this step-by-step, you can explore the instructional materials, which walk through how these positions connect across the fretboard and how to apply them in real musical situations.
If you’d rather work through it directly and apply it to your own playing, you can reach out about one-on-one lessons.